- New Holland & Case IH Tractor Hitch Error List
- Electronic Hitch Error Codes (CFPS or GCM1) from 101 to 4146
- Hitch Error Code 101 – 4146
- Hitch Error Codes 4147 – 4313
- Hitch Error Codes 4314 – 4358
- Electronic Hydraulic Remote Error Codes R1 – R57
- Can I Clear New Holland & Case IH Tractor Hitch Errors Myself?
- How Can I Prevent Case IH & New Holland Hitch DTC Errors?
Certainly, here’s a guide to understanding Hitch error codes for New Holland and Case IH tractors. These Diagnostic Trouble Codes (DTC) are crucial for diagnosing issues related to the tractor’s hitch system. Modern tractors are equipped with advanced hitch systems, often referred to as 3-point hitches, that play a crucial role in various agricultural tasks. However, these systems can encounter issues from time to time. Here’s what you need to know:
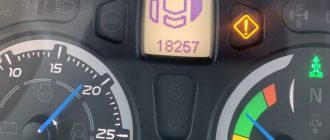
What Are Tractor Hitch Error Codes? Tractor Hitch error codes are Diagnostic Trouble Codes (DTC) generated by the hitch system when it detects a problem or malfunction. These codes serve as a diagnostic tool to pinpoint issues within the tractor’s hitch system.

Common Error Codes: The specific error codes can vary between tractor models, but some common ones include: Hitch DTC 001: Hitch Position Sensor Fault; Hitch DTC 002: Implement Not Detected; Hitch DTC 101: Hitch Control Valve Malfunction; Hitch DTC 201: Hitch Position Out of Range; Hitch DTC 301: Hitch Lowering Speed Too Slow.
Tractor Hitch error codes are vital for efficient troubleshooting. When an issue arises, these codes provide a starting point for identifying and addressing the problem promptly, reducing downtime during critical farming operations.
New Holland & Case IH Tractor Hitch Error List
Here is the table containing New Holland / Case IH tractor hitch error code numbers along with their corresponding error descriptions:
Electronic Hitch Error Codes (CFPS or GCM1) from 101 to 4146
| Error Code | Error Description |
|---|---|
| Hitch HL | Height limit incorrectly set to perform auto calibration |
| Hitch 1 | Hitch Position Sensor Fault |
| Hitch 2 | Poor Or No Signal From Tractor Performance Monitor Radar |
| Hitch 3 | Radar (Ground Speed) Greater Than Wheel Speed |
| Hitch 4 | Wheel Speed Greater Than Maximum Speed Of Tractor |
| Hitch 5 | Wheel Speed Zero When Radar Is Indicating Ground Speed |
| Hitch 6 | Slip Control Voltage Low (Short Or Open Circuit) |
| Hitch 7 | Slip Control Voltage High (Damaged Potentiometer Or Short To +12 Volts) |
| Hitch 8 | Raise/Work Switch Failure |
| Hitch 9 | Both External Lift/Lower Fender Switches Are Being Operated Simultaneously |
| Hitch 10 | Height Limit Control Voltage Low (Short Or Open Circuit) |
| Hitch 11 | Height Limit Control Voltage High (Damaged Potentiometer Or Short To +12 Volts) |
| Hitch 12 | Drop Rate Control Voltage Low (Short Or Open Circuit) |
| Hitch 13 | Drop Rate Control Voltage High (Damaged Potentiometer Or Short To +12 Volts) |
| Hitch 14 | Open Circuit Connection To Load Sensing Pin, Short Circuit To Ground Or Failed Load Sensing Pin |
| Hitch 15 | Load Sensing Pin Short Circuit To +12 Volts, Failed Or Corroded Load Sensing Pin |
| Hitch 16 | Open Circuit Connection To Load Sensing Pin, Short Circuit To Ground Or Failed Load Sensing Pin |
| Hitch 17 | Load Sensing Pin Short Circuit To +12 Volts, Failed Or Corroded Load Sensing Pin |
| Hitch 18 | Both Load Sensing Pins Disconnected |
| Hitch 19 | Pin Reference Voltage Less Than 8 Volts (Short Or Open Circuit) |
| Hitch 20 | Pin Reference Voltage Greater Than 8 Volts (Short To +12 Volts) |
| Hitch 21 | Draft Sensitivity Control Voltage Low (Short Or Open Circuit) |
| Hitch 22 | Draft Sensitivity Control Voltage High (Damaged Potentiometer Or Short To +12 Volts) |
| Hitch 23 | Control Panel Disconnected |
| Hitch 24 | Perform Hydraulic Lift Calibration |
| Hitch 25 | Position Lever Potentiometer Control Voltage Low (Short Or Open Circuit) |
| Hitch 26 | Position Lever Potentiometer Control Voltage High (Damaged Potentiometer Or Short To +12 Volts) |
| Hitch 27 | Lift Arm Position Sensing Control Voltage Low (Short Or Open Circuit) |
| Hitch 28 | Lift Arm Position Sensing Control Voltage High (Damaged Potentiometer Or Short To +12 Volts) |
| Hitch 29 | Hydraulic Control Valve Disconnected |
| Hitch 30 | Signal Ground Open Circuit |
| Hitch 31 | Chassis Harness Disconnected |
| Hitch 32 | Draft Load Potentiometer Shorted To +12v |
| Hitch 33 | Draft Control Potentiometer Open Circuit Or Short To Ground |
| Hitch 49 | Wheel Speed Sensor Open Or Short Circuit |
| Hitch 53 | Microprocessor 5 Volt Reference Shorted To +12 Volts |
| Hitch 54 | Microprocessor 5 Volt Reference Shorted To Ground |
| Hitch 57 | EDC Microprocessor Failure |
| Hitch 59 | Microprocessor Reference Voltage Open Circuit |
| Hitch 63 | EDC Hydraulic Valve Lower Solenoid Open Circuit |
| Hitch 64 | EDC Hydraulic Valve Raise Solenoid Open Circuit |
| Hitch 65 | EDC Hydraulic Valve Lower Solenoid Short Circuit |
| Hitch 66 | EDC Hydraulic Valve Raise Solenoid Short Circuit |
| Hitch 67 | EDC Hydraulic Valve Supply Voltage Too Low |
| Hitch 69 | Control Lever EDC Raise/Lower Switch Failure |
Hitch Error Code 101 – 4146
| Error Code | Error Description |
|---|---|
| Hitch 101 | Hitch Control Valve Malfunction |
| Hitch 201 | Hitch Position Out of Range |
| Hitch 301 | Hitch Lowering Speed Too Slow |
| Hitch 1002 | Lift hitch valve coil short circuit to 12 volts or malfunction of the lift hitch valve coil circuit. |
| Hitch 1003 | Open or short to ground, lift hitch valve coil circuit malfunction. |
| Hitch 1004 | Lower hitch valve coil – 12V short circuit or malfunction of the lower hitch valve coil circuit. |
| Hitch 1005 | Open or short to ground in the lower hitch valve coils. |
| Hitch 1006 | EDC Low side driver stuck on failure. |
| Hitch 1007 | Underside driver watchdog test failed. |
| Hitch 1008 | Low side of lift solenoid permanently connected to GND |
| Hitch 1009 | Low side of lower solenoid permanently connected to GND |
| Hitch 1011 | TCU (Tractor Control Unit) disconnected from CAN bus. |
| Hitch 1012 | No communication with ACM (armrest controller module). |
| Hitch 1013 | No communication with ICP (instrument panel). |
| Hitch 1014 | The five volt reference is above the high voltage limit. |
| Hitch 1015 | The five volt reference is below the lower voltage limit. |
| Hitch 1017 | The position command value received over the CAN data bus from the armrest indicates a malfunction of the position command potentiometer. |
| Hitch 1018 | Hitch propshaft position potentiometer open/short/out of adjustment or circuit malfunction. |
| Hitch 1019 | The upper limit value received from the CAN data bus indicates a malfunction. |
| Hitch 1021 | The download command value received from the CAN data bus indicates a malfunction. |
| Hitch 1022 | Single drawbar sensor failure when configured for one drawbar sensor. (CCH only) |
| Hitch 1023 | Two drawbar sensor failure when setting for two drawbar pins. (CCH only) |
| Hitch 1024 | CAN ICU bus signal lost. |
| Hitch 1025 | Up/Down/Down Switch momentary value received from the CAN data bus indicates a switch failure. |
| Hitch 1026 | Remote wing up/down switch failure. |
| Hitch 1028 | The value of the travel range potentiometer received from the CAN data bus indicates a malfunction. |
| Hitch 1029 | The Drop Rate value received from the CAN data bus indicates a potentiometer failure. |
| Hitch 1030 | Right drawbar voltage out of normal operating range. (CCH only) |
| Hitch 1031 | Left drawbar voltage is out of normal operating range. (CCH only) |
| Hitch 1032 | Ground speed fault value received from the CAN data bus indicates a fault. |
| Hitch 1033 | The slip limit setpoint received from the CAN data bus indicates a malfunction. |
| Hitch 1034 | The slip enable switch received from the CAN data bus indicates a malfunction. |
| Hitch 1035 | Percentage slippage received from ETC indicates a failure condition. |
| Hitch 1036 | ARU reports that the EDC Inching Up switch is faulty or unavailable. |
| Hitch 1037 | ARU reports that the EDC Inching Down switch is faulty or unavailable. |
| Hitch 1065 | ARU hitch detected a tractor without traction control (hitch only position) but detected the presence of the drawbar pin(s). |
| EHR 4135 | Rear Remote Control #3 – Excessive spool deflection |
| EHR 4136 | Rear Remote Control #3 – Open Center Position Not Reached |
| EHR 4137 | Rear Remote Control #3 – Manual |
| EHR 4138 | Rear Remote Control #3 – Output Stage Faulty |
| EHR 4139 | Rear Remote Control #3 – Position Sensor Defective |
| EHR 4140 | Rear Remote Control #3 – Spool cannot be returned to neutral |
| EHR 4141 | Rear remote Control #3 – spool not in neutral when turned on |
| EHR 4142 | Rear Remote Control #4 – No EHR Control Messages |
| EHR 4143 | Rear Remote Control #4 – Implausible EHR Control Messages |
| EHR 4144 | Rear Remote Control #4 – Checksum Verification Error |
| EHR 4145 | Rear Remote Control #4 – Neutral Set Point |
| EHR 4146 | Rear Remote Control #4 – Energized |
Hitch Error Codes 4147 – 4313
| Error Code | Error Description |
|---|---|
| EHR 4147 | Rear Remote Control #4 – Overvoltage |
| EHR 4148 | Rear Remote Control #4 – Spool deflection too small |
| EHR 4149 | Rear Remote Control #4 – Spool Excessive Deflection |
| EHR 4150 | Rear Remote Control #4 – Open Center Position Not Reached |
| EHR 4151 | Rear Remote Control #4 – Manual |
| EHR 4152 | Rear Remote Control #4 – Output Stage Faulty |
| EHR 4153 | Rear Remote Control #4 – Position Sensor Defective |
| EHR 4154 | Rear Remote Control #4 – Spool cannot be returned to neutral |
| EHR 4155 | Rear Remote Control #4 – Spool not in neutral when turned on |
| EHR 4156 | Rear Remote Control #5 – No EHR Control Messages |
| EHR 4157 | Rear Remote Control #5 – Implausible EHR Control Messages |
| EHR 4158 | Rear Remote Control #5 – Checksum Verification Error |
| EHR 4159 | Rear Remote Control #5 – Neutral Set Point |
| EHR 4160 | Rear Remote Control #5 – Energized |
| EHR 4161 | Rear Remote #5 – Overvoltage |
| EHR 4162 | Rear Remote #5 – Spool deflection too small |
| EHR 4163 | Rear Remote #5 – Excessive spool deviation |
| EHR 4164 | Rear Remote Control #5 – Open Center Position Not Reached |
| EHR 4165 | Rear Remote Control #5 – Manual |
| EHR 4166 | Rear Remote Control #5 – Output Stage Faulty |
| EHR 4167 | Rear Remote Control #5 – Position Sensor Defective |
| EHR 4168 | Rear Remote #5 – Spool cannot be returned to neutral |
| EHR 4169 | Rear remote #5 – spool not in neutral when turned on |
| EHR 4170 | Rear remote control #1 – Lever not calibrated |
| EHR 4173 | Rear Remote Control #2 – Arm Not Calibrated |
| EHR 4177 | Rear Remote Control #3 – Arm Not Calibrated |
| EHR 4180 | Rear Remote #4 – Lever Not Calibrated |
| EHR 4190 | EHR 1 Offline Error |
| EHR 4191 | EHR 2 Offline Error |
| EHR 4192 | EHR 3 Offline Error |
| EHR 4193 | EHR 4 Offline Error |
| EHR 4198 | EHR 5 Offline Error |
| EHR 4216 | Rear Remote #1 – Valve Spool Not Calibrated |
| EHR 4217 | Rear Remote #2 – Valve Spool Not Calibrated |
| EHR 4218 | Rear Remote #3 – Valve Spool Not Calibrated |
| EHR 4219 | Rear Remote #4 – Valve Spool Not Calibrated |
| EHR 4220 | Rear Remote #5 – Valve Spool Not Calibrated |
| EHR 4301 | Rear Remote #6 – No EHR Control Messages |
| EHR 4302 | Rear Remote #6 – Implausible EHR Control Messages |
| EHR 4303 | Rear Remote Control #6 – Checksum Verification Error |
| EHR 4304 | Rear Remote Control #6 – Neutral Setpoint |
| EHR 4305 | Rear Remote Control #6 – Energized |
| EHR 4306 | Rear Remote Control #6 – Overvoltage |
| EHR 4307 | Rear Remote No.6 – Spool deflection too small |
| EHR 4308 | Rear Remote No.6 – Excessive Spool Deflection |
| EHR 4309 | Rear Remote Control #6 – Open Center Position Not Reached |
| EHR 4310 | Rear Remote Control #6 – Manual |
| EHR 4311 | Rear Remote Control #6 – Output Stage Faulty |
| EHR 4312 | Rear Remote Control #6 – Position Sensor Defective |
| EHR 4313 | Rear Remote #6 – Spool cannot be returned to neutral |
Hitch Error Codes 4314 – 4358
| Error Code | Error Description |
|---|---|
| EHR 4314 | Rear remote #6 – Spool not in neutral when turned on |
| EHR 4315 | Rear Remote #7 – No EHR Control Messages |
| EHR 4316 | Rear Remote #7 – Implausible EHR Control Messages |
| EHR 4317 | Rear Remote Control #7 – Checksum Verification Error |
| EHR 4318 | Rear Remote Control #7 – Neutral Setpoint |
| EHR 4319 | Rear Remote Control #7 – Energized |
| EHR 4320 | Rear Remote Control #7 – Overvoltage |
| EHR 4321 | Rear Remote No.7 – Spool deflection too small |
| EHR 4322 | Rear Remote No.7 – Excessive spool deflection |
| EHR 4323 | Rear Remote Control #7 – Open Center Position Not Reached |
| EHR 4324 | Rear Remote Control #7 – Manual |
| EHR 4325 | Rear Remote Control #7 – Output Stage Faulty |
| EHR 4326 | Rear Remote Control #7 – Position Sensor Defective |
| EHR 4327 | Rear remote #7 – Spool cannot be returned to neutral |
| EHR 4328 | Rear Remote Control #7 – Spool not in neutral when turned on |
| EHR 4329 | Rear Remote #8 – No EHR Control Messages |
| EHR 4330 | Rear Remote No.8 – Implausible EHR control messages |
| EHR 4331 | Rear Remote Control #8 – Checksum Verification Error |
| EHR 4332 | Rear Remote Control #8 – Neutral Set Point |
| EHR 4333 | Rear Remote Control #8 – Energized |
| EHR 4334 | Rear Remote Control #8 – Surge |
| EHR 4335 | Rear Remote No.8 – Spool deflection too small |
| EHR 4336 | Rear Remote No.8 – Excessive Spool Deflection |
| EHR 4337 | Rear Remote Control #8 – Open Center Position Not Reached |
| EHR 4338 | Rear Remote Control #8 – Manual |
| EHR 4339 | Rear Remote Control #8 – Output Stage Faulty |
| EHR 4330 | Rear Remote Control #8 – Position Sensor Defective |
| EHR 4341 | Rear remote #8 – Spool cannot be returned to neutral |
| EHR 4342 | Rear remote #8 – Spool not in neutral when turned on |
| EHR 4343 | Rear Remote Control #5 – Arm Not Calibrated |
| EHR 4344 | Rear Remote #6 – Lever Not Calibrated |
| EHR 4345 | Rear Remote #7 – Lever Not Calibrated |
| EHR 4346 | Rear Remote Control #8 – Arm Not Calibrated |
| EHR 4347 | EHR 6 Offline Error |
| EHR 4348 | EHR 7 Offline Error |
| EHR 4349 | EHR 8 Offline Error |
| EHR 4350 | Rear Remote Control #6 – Valve Spool Not Calibrated |
| EHR 4351 | Rear Remote Control #7 – Valve Spool Not Calibrated |
| EHR 4352 | Rear Remote Control #8 – Valve Spool Not Calibrated |
| EHR 4353 | EHR FB 1 High error |
| EHR 4354 | EHR FB 1 Low error |
| EHR 4355 | EHR FB 3 High error |
| EHR 4356 | EHR FB 3 Low error |
| EHR 4357 | EHR Lower Limit Implementation error |
| EHR 4358 | EHR Implement lifting error |
Electronic Hydraulic Remote Error Codes R1 – R57
| Error Code | Error Description |
|---|---|
| R1 | EHR Control Unit 1 Lever Not Calibrated |
| R2 | EHR Control Unit 2 Lever Not Calibrated |
| R3 | EHR Control Unit 3 Lever Not Calibrated |
| R4 | EHR Control Unit 4 Lever Not Calibrated |
| R11 | EHR Control Unit 1 Float Switch Error |
| R12 | EHR Control Unit 1 Active Switch Error |
| R13 | CAN Messages Received By The EHR Valve 1 Are Corrupted Or Missing |
| R14 | Valve 1 Supply Under Voltage/Over Voltage Or Output Stage Faulty Or Transducer Faulty Or Spool Neutral Error Or Spool Not Neutral Error |
| R15 | Valve 1 Spool Travel Short Or Spool Travel Excessive Or Open Centre Not Reached |
| R16 | EHR Control Unit 1 Full Flow Switch Error |
| R17 | No Communication Between The EHR Valve 1 And The Central Controller (XCM) |
| R18 | EHR Control Unit 1 Lever Faulty |
| R21 | EHR Control Unit 2 Float Switch Error |
| R22 | EHR Control Unit 2 Active Switch Error |
| R23 | CAN Messages Received By The EHR Valve 2 Are Corrupted Or Missing |
| R24 | Valve 2 Supply Under Voltage/Over Voltage Or Output Stage Faulty Or Transducer Faulty Or Spool Neutral Error Or Spool Not Neutral Error |
| R25 | Valve 2 Spool Travel Short Or Spool Travel Excessive Or Open Centre Not Reached |
| R26 | EHR Control Unit 2 Full Flow Switch Error |
| R27 | No Communication Between The EHR Valve 2 And The Central Controller (XCM) |
| R28 | EHR Control Unit 2 Lever Faulty |
| R31 | EHR Control Unit 3 Float Switch Error |
| R32 | EHR Control Unit 3 Active Switch Error |
| R33 | CAN Messages Received By The EHR Valve 3 Are Corrupted Or Missing |
| R34 | Valve 3 Supply Under Voltage/Over Voltage Or Output Stage Faulty Or Transducer Faulty Or Spool Neutral Error Or Spool Not Neutral Error |
| R35 | Valve 3 Spool Travel Short Or Spool Travel Excessive Or Open Centre Not Reached |
| R36 | EHR Control Unit 3 Full Flow Switch Error |
| R37 | No Communication Between The EHR Valve 3 And The Central Controller (XCM) |
| R38 | EHR Control Unit 3 Lever Faulty |
| R41 | EHR Control Unit 4 Float Switch Error |
| R42 | EHR Control Unit 4 Active Switch Error |
| R43 | CAN Messages Received By The EHR Valve 4 Are Corrupted Or Missing |
| R44 | Valve 4 Supply Under Voltage/Over Voltage Or Output Stage Faulty Or Transducer Faulty Or Spool Neutral Error Or Spool Not Neutral Error |
| R45 | Valve 4 Spool Travel Short Or Spool Travel Excessive Or Open Centre Not Reached |
| R46 | EHR Control Unit 4 Full Flow Switch Error |
| R47 | No Communication Between The EHR Valve 4 And The Central Controller (XCM) |
| R48 | EHR Control Unit 4 Lever Faulty |
| R53 | CAN Messages Received By The EHR Valve 5 Are Corrupted Or Missing |
| R54 | Valve 5 Supply Under Voltage/Over Voltage Or Output Stage Faulty Or Transducer Faulty Or Spool Neutral Error Or Spool Not Neutral Error |
| R55 | Valve 5 Spool Travel Short Or Spool Travel Excessive Or Open Centre Not Reached |
| R57 | No Communication Between The EHR Valve 5 And The Central Controller (XCM) |
When an error code is displayed, consult the tractor’s manual or reach out to a qualified tractor mechanic. They will use specialized diagnostic equipment to pinpoint the specific problem within the hitch system. Preventive maintenance can help reduce the occurrence of error codes. Routine inspections of the hitch components, including sensors, hydraulic lines, and control valves, can prevent issues from escalating.
Tractor operators should be trained to recognize error code notifications related to the hitch system. Promptly reporting error codes to maintenance personnel can prevent further complications. Overloading the hitch system beyond its rated capacity can lead to errors. Operators should always adhere to weight limits specified for their tractor’s hitch.
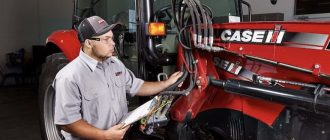
If you encounter an error code that you’re unsure how to address or if the issue persists despite basic troubleshooting, it’s advisable to consult a certified tractor mechanic. They have the expertise and tools to diagnose and repair complex hitch system problems.
Understanding Tractor Hitch error codes is crucial for maintaining the efficiency of your New Holland or Case IH tractor’s hitch system. Regular maintenance, operator training, and professional assistance when needed can help keep your tractor’s hitch system in top condition, ensuring smooth agricultural operations.
Can I Clear New Holland & Case IH Tractor Hitch Errors Myself?
Clearing hitch errors on New Holland and Case IH tractors may be possible in certain cases, but it’s essential to approach this with caution. Hitch errors often indicate potential issues with the tractor’s hitch or hydraulic system, and clearing them without addressing the root cause could lead to persistent problems.
Here are some considerations if you’re contemplating clearing hitch errors yourself:
- Refer to the New Holland & Case IH Manual: Consult the tractor’s service manual for information about hitch errors, their meanings, and any recommended troubleshooting steps. The manual will provide specific guidance related to your tractor model.
- Address Underlying Issues: Before attempting to clear hitch errors, identify and address any underlying issues causing the codes. Clearing codes without resolving the problem may lead to ongoing malfunctions.
- Use Diagnostic New Holland & Case IH Tools: Specialized diagnostic tools, often specific to the manufacturer, may be required to clear hitch errors. If you have access to such tools, follow the manufacturer’s instructions for code clearing procedures.
- Disconnect New Holland & Case IH Battery: Disconnecting the tractor’s battery for a short period may reset the electronic control systems and clear some errors. However, this method may not work for all models, and it’s essential to check the manual.
- Seek Professional Assistance: If you are unsure about how to clear hitch errors or if you are unable to resolve the underlying issue, it’s advisable to seek assistance from a certified New Holland or Case IH mechanic or an authorized service center. They have the expertise to diagnose and address problems properly.
Clearing error codes without addressing the root cause may lead to ongoing issues. Always prioritize safety, follow manufacturer guidelines, and use appropriate diagnostic tools. If you lack the necessary tools or expertise, involving professionals is the safest and most effective approach when working on your tractor’s hitch system.
How Can I Prevent Case IH & New Holland Hitch DTC Errors?
Preventing Hitch (Hydraulic System) Diagnostic Trouble Code (DTC) errors on Case IH and New Holland tractors involves a combination of regular maintenance, proper operation, and vigilant troubleshooting. Here are some tips to help prevent Hitch DTC errors:
- Regular Maintenance & Operate within Specifications: Follow the manufacturer’s recommended maintenance schedule outlined in the tractor’s service manual. Regularly check and replace hydraulic fluids, filters, and worn-out components to ensure optimal performance of the hitch system. Operate the tractor within the specified load capacities and operational parameters outlined in the user manual. Avoid exceeding the limits of the hydraulic system, as this can lead to stress and potential errors.
- Calibrate Sensors & Check Hydraulic Connections: If your tractor is equipped with sensors related to the hitch system, ensure they are calibrated according to the manufacturer’s guidelines. Accurate sensor readings are crucial for proper system function. Regularly inspect hydraulic connections, hoses, and fittings for signs of wear, leaks, or damage. Ensure all connections are secure, and address any issues promptly.
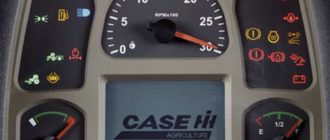
- Monitor Warning Lights & Keep Tractor Software Updated: Pay attention to warning lights or indicators on the tractor’s dashboard related to the hitch system. If any warning lights illuminate, address the issue promptly rather than continuing to operate the tractor with potential problems. If your tractor’s hitch system relies on software, keep it updated to the latest version provided by the manufacturer. Software updates may include improvements and bug fixes.
- Protect from Environmental Factors & Proper Shutdown Procedures: Shield the tractor from extreme weather conditions, especially when not in use. Moisture, excessive heat, and other environmental factors can contribute to hydraulic issues. Follow proper shutdown procedures outlined in the manual. Avoid abrupt stops or shutting down the tractor without allowing the hydraulic system to cool down if necessary.
- Professional Inspections & Operator Training: Schedule regular inspections by certified technicians. Professionals can identify and address potential issues before they lead to DTC errors. Ensure that tractor operators are trained on proper usage, maintenance, and troubleshooting procedures. Knowledgeable operators are more likely to detect and prevent issues.
By following these preventive measures, you can minimize the likelihood of Hitch DTC errors on your Case IH and New Holland tractors. Regular maintenance, proper operation, and prompt attention to warning signs contribute to the overall reliability and performance of the tractor’s hitch system and hydraulic components.
DTC Fault Code Lists of New Holland & Case IH Tractors:
- Armrest Errors
- ATC Error Codes
- Auxiliary Remote Valve Errors
- DCU Errors
- Engine Error Codes
- Front PTO Error Codes
- Instrument Control Unit Errors
- INST Error Codes
- MFD/Diff List of Errors
- Multifunction Controller Errors
- Rear PTO Error Codes
- Suspension Errors
- Transmission Error Codes
- FAQ for CNH Industrial DTCs