- How to Reset Kubota L01 Series Tractor Error Codes
- How to Reset Kubota L60 Series Tractor Error Codes
- How to Reset Kubota SSL / Track Loaders Error Codes
- How to Reset Kubota Wheel Loaders Error Codes
- How to Reset Kubota Excavators Fault Codes
- Kubota DPF Alert: Now What? Regeneration?
- Can I Clear Kubota Errors with a CAN Bus Emulator?
- How to Reset Kubota Fault Codes with DiagMaster
Kubota tractors and agricultural equipment are known for their reliability and durability. However, like any machinery, they may encounter issues from time to time, which can be indicated by error codes. These error codes, also known as diagnostic trouble codes (DTCs), are essential for diagnosing problems and ensuring optimal performance.
In this guide, we’ll walk you through the process of resetting Kubota error codes, allowing you to clear any diagnostic codes that may appear on your Kubota equipment. Whether you’re a seasoned operator or new to Kubota machinery, understanding how to reset error codes can help you troubleshoot issues efficiently and get back to work with minimal downtime. From understanding common error codes to performing the reset procedure step by step, this guide will provide you with the knowledge and confidence to address error codes on your Kubota equipment effectively. Let’s dive in and learn how to reset Kubota error codes like a pro!
How to Reset Kubota L01 Series Tractor Error Codes
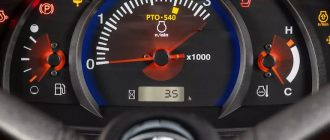
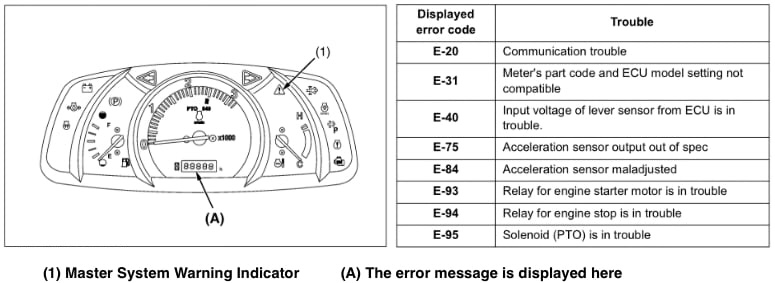
When the Kubota instrumental panel detects something wrong, the master system warning indicator (1) starts blinking and the tractor error code indicating the location of the trouble. Showed in below is displayed on the LCD.
Mode “A” (Test Mode)
- While holding down both DPF INHIBIT switch and parked regeneration switch, turn the key switch to “ON” or “START” position.
- Mode selection display is indicated on the Kubota LCD.
- Press the parked regeneration switch and the mode indicated on the LCD is changed.
- If “A” is indicated on the LCD, press the parked regeneration switch for more than 2 seconds.
- Tractor test mode is selected.
- If parked regeneration switch is pressed, the display item is changed.
- Turn off the key switch to finish test mode.
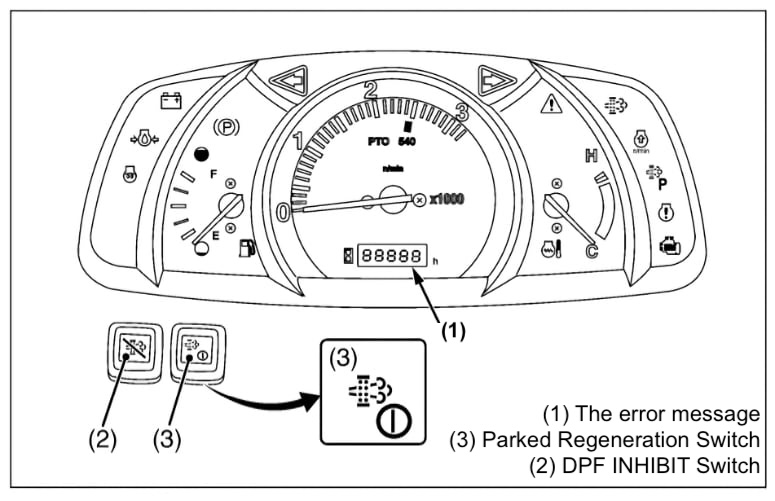
Mode “B” (Error Information Clear Mode)
- While holding down both DPF INHIBT switch and the parked regeneration switch, turn key switch “ON” or “START” position.
- Mode selection display is indicated on the Kubota LCD.
- Press the parked regeneration switch and the mode indication on the LCD is changed.
- If “B” is indicated on the LCD, press the parked regeneration switch for more than 2 seconds.
- Error information Clear mode is selected and the expression “PUSH” is displayed.
- Press the parked regeneration switch for more than 2 seconds.
- The expression “OFF” is displayed.
- Turn off the key switch.
Be sure to clear Kubota error information by performing this procedure after servicing is finished.
How to Reset Kubota L60 Series Tractor Error Codes
This instructions to tractors with the IntelliPanel style dash.
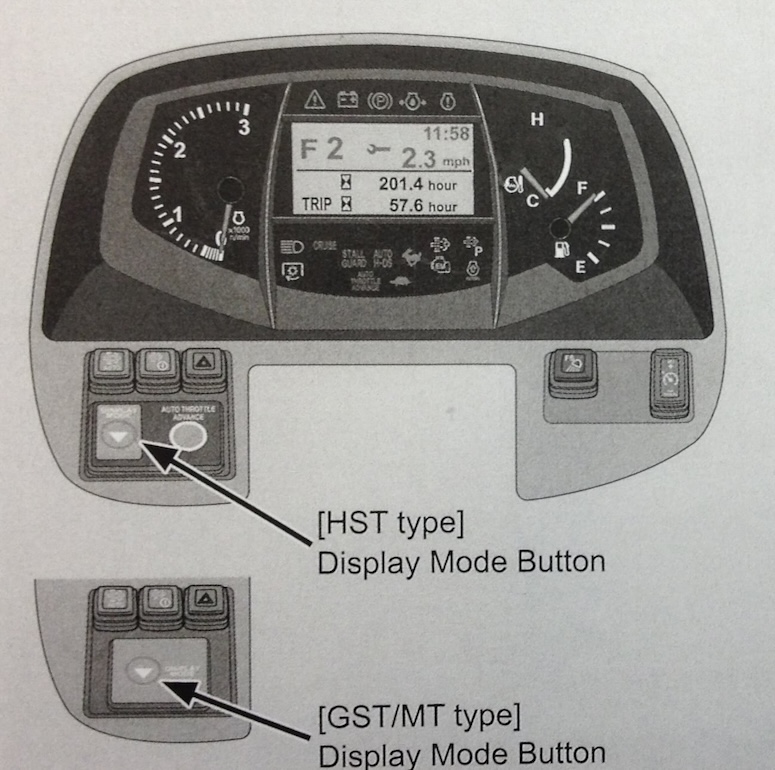
Mode “A” is a diagnostic mode and gives information about your temps, rpms and volts going to switches on the unit, kind of neat to look at and could be helpful in the future.
- Press Display mode button and hold.
- Turn Key to On.
- Several modes will appear.
- Press Display Mode until “D” is highlighted.
- Press and hold display mode for more than 2 seconds.
- “Want to clear codes? Hold button for 3 seconds more” Will appear.
- Press and hold Display Mode for 3 seconds.
- “Cleared” will appear.
- Turn key to “off”.
Then your computer should be reset.
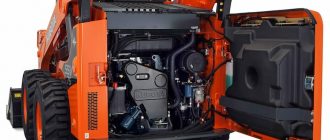
How to Reset Kubota SSL / Track Loaders Error Codes
Resetting error codes on a Kubota skid steer loader / compact track loaders typically involves using the machine’s diagnostic display or control panel. Here’s a general guide on how to reset error codes:
- Access the Diagnostic Display: Depending on the specific model of your Kubota compact track / skid steer loader, there should be a diagnostic display or control panel where error codes are shown. Locate this display panel on your machine.
- Identify the Error Codes: Check the diagnostic display to identify the error codes that are currently active or stored in the system. Error codes are typically alphanumeric combinations that indicate specific issues with the machine.
- Refer to the Operator’s Manual: Consult the operator’s manual or technical documentation provided by Kubota for information on how to reset error codes. The manual should contain detailed instructions tailored to your skid steer loader model.
- Follow the Reset Procedure: Use the controls or buttons on the diagnostic display panel to navigate through the menu options and locate the option for clearing or resetting error codes. The procedure may involve pressing specific buttons in a sequence or holding down certain buttons for a set period.
- Confirm Reset: Once you’ve initiated the reset procedure, the display panel should provide feedback indicating that the error codes have been cleared. Some machines may require you to confirm the reset action before proceeding.
- Restart the Machine: After successfully resetting the error codes, restart the Kubota skid steer / track loader to allow the changes to take effect. Monitor the diagnostic display for any new error codes that may appear during startup or operation.
- Monitor for Recurring Issues: Keep an eye on the machine’s performance and diagnostic display for any recurring error codes or indications of persistent issues. If errors persist, further troubleshooting or professional assistance may be required.
Remember to always prioritize safety when working with heavy machinery. If you’re unsure about resetting error codes or encounter any difficulties, it’s best to consult with a qualified technician or Kubota service center for assistance.
How to Reset Kubota Wheel Loaders Error Codes
Resetting error codes on a Kubota wheel loader typically involves accessing the machine’s diagnostic system and following specific procedures outlined in the operator’s manual. Here’s a general guide on how to reset error codes on a Kubota wheel loader:
- Locate the control panel on the Kubota wheel loader. This panel is usually found in the operator’s compartment or dashboard area.
- Use the diagnostic display to identify the error codes currently stored or displayed. Error codes are alphanumeric combinations that indicate specific issues with the machine’s components or systems.
- Refer to the operator’s manual provided by Kubota for detailed instructions on resetting error codes. The manual will contain specific procedures tailored to your wheel loader model.
- Navigate through the diagnostic menu options using the controls or buttons on the display panel. Look for the option to clear or reset error codes. The procedure may involve selecting a specific menu option or pressing a combination of buttons in a sequence.
- Once you’ve initiated the reset procedure, the display panel should provide confirmation that the error codes have been cleared. Some machines may require you to confirm the reset action before proceeding.
- After successfully resetting the error codes, turn off the Kubota wheel loader and then restart it. Allow the machine to go through its startup sequence, and check the diagnostic display for any new error codes that may appear.
- Keep an eye on the machine’s performance and diagnostic display for any recurring error codes or indications of persistent issues. If errors persist, further troubleshooting or professional assistance may be required.
Always prioritize safety when working with heavy machinery. If you encounter any difficulties or are unsure about resetting error codes, consult with a qualified technician or Kubota service center for assistance.
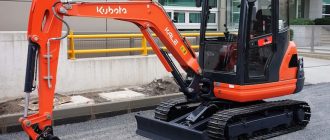
How to Reset Kubota Excavators Fault Codes
Resetting fault codes on Kubota excavators typically involves accessing the diagnostic system and following specific procedures outlined in the operator’s manual. Here’s a general guide on how to reset fault codes on Kubota excavators:
- Locate the diagnostic display or control panel on the Kubota excavator. This panel is usually found in the operator’s compartment or dashboard area.
- Use the diagnostic display to identify the fault codes currently stored or displayed. Fault codes are alphanumeric combinations that indicate specific issues with the excavator’s components or systems.
- Refer to the operator’s manual provided by Kubota for detailed instructions on resetting fault codes. The manual will contain specific procedures tailored to your excavator model.
- Navigate through the diagnostic menu options using the controls or buttons on the display panel. Look for the option to clear or reset fault codes. The procedure may involve selecting a specific menu option or pressing a combination of buttons in a sequence.
- Once you’ve initiated the reset procedure, the display panel should provide confirmation that the fault codes have been cleared. Some machines may require you to confirm the reset action before proceeding.
- After successfully resetting the fault codes, turn off the Kubota excavator and then restart it. Allow the machine to go through its startup sequence, and check the diagnostic display for any new fault codes that may appear.
- Keep an eye on the excavator’s performance and diagnostic display for any recurring fault codes or indications of persistent issues. If faults persist, further troubleshooting or professional assistance may be required.
Always prioritize safety when working with heavy machinery. If you encounter any difficulties or are unsure about resetting fault codes, consult with a qualified technician or Kubota service center for assistance. To prevent the recurrence of fault codes and ensure optimal performance, adhere to the recommended maintenance schedule outlined in the operator’s manual. Regular inspections, servicing, and preventive maintenance can help minimize faults and extend the lifespan of your Kubota excavator.
Kubota DPF Alert: Now What? Regeneration?
Watch this helpful video about operation tips for when your machine signals that the regeneration process is underway.
Kubota’s Automatic Regeneration System effectively eliminates accumulated soot within the DPF muffler, ensuring its cleanliness and enabling extended working hours. As a safety measure, the automatic regeneration feature can be deactivated in fire-prone environments. Nevertheless, if the operator disables the regeneration process more than three times, the Kubota engine will activate auto-regen mode autonomously.
Can I Clear Kubota Errors with a CAN Bus Emulator?
Clearing Kubota errors with a CAN bus emulator might be possible, but it’s important to note that using such a tool for diagnostic and maintenance purposes should be done with caution and according to manufacturer guidelines. CAN bus emulators are typically used for testing and simulation rather than directly interacting with an equipment’s onboard diagnostic system.
To clear errors using a CAN bus emulator, you would need to simulate the appropriate diagnostic messages that correspond to clearing error codes in the Kubota equipment’s CAN bus system. This would require a deep understanding of the Kubota equipment’s CAN bus protocol and the specific commands required to clear error codes.
However, it’s essential to highlight a few important points:
- Compatibility: Ensure that the CAN bus emulator is compatible with Kubota equipment and supports the protocols used by Kubota’s diagnostic system.
- Knowledge and Expertise: Clearing error codes with a CAN bus emulator requires technical expertise and a thorough understanding of the equipment’s diagnostic system. Incorrect manipulation of the CAN bus system can potentially cause damage or malfunction.
- Manufacturer Guidelines: Always follow the manufacturer’s guidelines and recommendations for diagnostic procedures and error code clearing. Using unauthorized tools or methods may void warranties or cause unintended consequences.
- Safety Considerations: Exercise caution and ensure proper safety protocols are followed when interacting with diagnostic systems and equipment.
- Professional Assistance: If you’re unsure about using a CAN bus emulator or clearing error codes, it’s advisable to seek assistance from qualified technicians or authorized service centers.
In summary, while it might be theoretically possible to clear Kubota errors with a CAN bus emulator, it’s crucial to proceed with caution, adhere to manufacturer guidelines, and ensure you have the necessary expertise to perform the task safely and effectively.
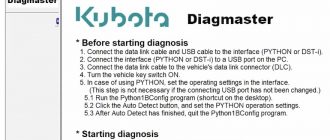
How to Reset Kubota Fault Codes with DiagMaster
Resetting Kubota fault codes using Kubota DiagMaster typically involves connecting the diagnostic tool to the Kubota equipment’s onboard diagnostic port and accessing the diagnostic menu to clear the codes.
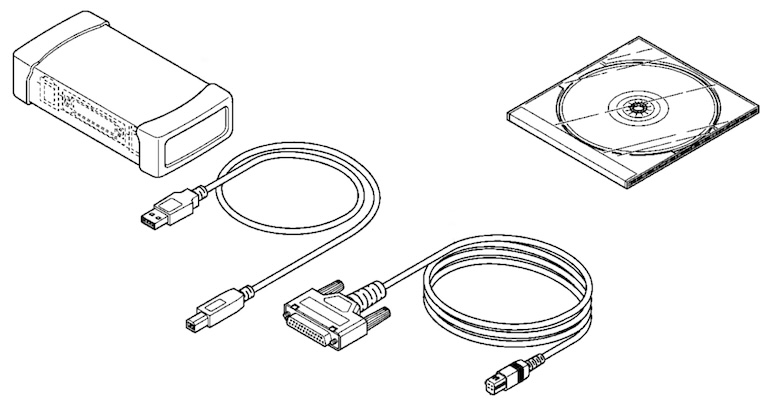
Here’s a general guide on how to reset Kubota fault codes using Kubota DiagMaster:
- Prepare the Equipment: Ensure that the Kubota equipment is parked on level ground and that the engine is turned off. Locate the onboard diagnostic port, usually located near the operator’s compartment or engine bay.
- Connect Kubota DiagMaster: Connect the Kubota Diagmaster tool to the diagnostic port on the Kubota equipment using the appropriate cable or adapter. Ensure that the connection is secure.
- Power On the Diagnostic Tool: Turn on the Kubota DiagMaster diagnostic tool by following the manufacturer’s instructions. Wait for the tool to initialize and establish communication with the Kubota equipment’s onboard systems.
- Access Diagnostic Menu: Navigate through the menu options on the Kubota Diagmaster diagnostic tool to access the diagnostic functions specific to your equipment. Look for the option to read and clear fault codes.
- Read Fault Codes: Use the diagnostic tool to read the fault codes stored in the Kubota equipment’s electronic control unit (ECU). The tool will display a list of fault codes along with descriptions of the associated issues.
- Clear Fault Codes: Once you’ve identified the fault codes, select the option to clear or reset the fault codes from the diagnostic menu. Follow the prompts on the diagnostic tool to confirm the reset action.
- Confirm Reset: After initiating the reset procedure, the diagnostic tool should provide confirmation that the fault codes have been cleared successfully. Ensure that you receive this confirmation before proceeding.
- Disconnect the Diagnostic Tool: Once the fault codes have been cleared, safely disconnect the Kubota DiagMaster tool from the onboard diagnostic port of the Kubota equipment.
- Restart the Equipment: Start the Kubota equipment’s engine and allow it to run for a few moments. Monitor the equipment’s performance and check for any recurrence of fault codes on the diagnostic tool.
- Monitor for Recurring Issues: Keep an eye on the Kubota equipment’s performance and diagnostic system for any signs of recurring fault codes or unresolved issues. If faults persist, further troubleshooting may be required.
Always prioritize safety when working with heavy machinery. If you encounter any difficulties or are unsure about resetting fault codes, consult with a qualified technician or Kubota service center for assistance. To prevent the recurrence of fault codes and ensure optimal performance, adhere to the recommended maintenance schedule outlined in the Kubota equipment’s operator’s manual. Regular inspections, servicing, and preventive maintenance can help minimize faults and extend the lifespan of your Kubota equipment.